A frame, or "window", is a container that holds other Swing components. Components include your buttons, text fields, text areas, combo boxes, radio buttons, checkboxes and many others. The frame is the basic foundation for creating your graphical user interface.
If you�ve ever done any web design, you can think of a frame as the webpage, and the components are all the buttons, radio buttons, checkboxes and jump menus you see on the page. This isn�t a very accurate analogy, but just keep in mind one thing: a frame is what you put your components into. (Note that frames here have nothing to do with the frames used to separate webpages.)
To create a frame object, we need to use the JFrame class. JFrame
is part of the Swing classes, so we have to import javax.swing.*;. The following program
creates a frame by creating an instance of the JFrame class. The instance variable
is given the name myFrame.
import javax.swing.*;  // import Swing classes

public class FramesFun {
 public static void main(String[] args)
 {
   JFrame myFrame = new JFrame();    // create a new instance of JFrame called myFrame
 }
}
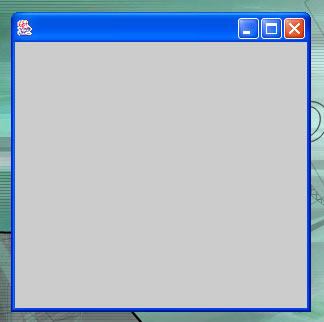
Simple enough, right? However, if you try compiling and running the program, you won�t see anything. This is because although you have created a frame object, you haven�t yet made it visible. By default, frames are invisible until you make them otherwise. Let�s revise our code then.
import javax.swing.*;   // import Swing classes

public class FramesFun()
{
  JFrame myFrame = new JFrame();    // create a new frame
  myFrame.setSize(300,300);         // specify the width and height of the frame
  myFrame.setVisible(true);         // make the frame visible
}
Note that the we have called two methods using our myFrame object: setSize and setVisible.
The setSize method simply specifies the dimensions of the frame. The first argument is the width
of the frame, the second argument is the height of the frame. Both are measured in pixels.
The setVisible method is the one that makes the frame visible. Note that if we passed
in false instead of true, the frame won�t appear. But why would anybody want
to pass in false, you ask?
Well, sometimes in GUI programming, you may find that a certain window isn�t needed temporarily,
so you make it invisible.
Now compile and run your program again. This time your frame should resemble the frame in the following picture. Note that this picture shows a frame when the program was run on Windows XP. On other versions of Windows and other operating systems, your frame will look different.
It would be wise now to mention that there are two alternatives to setSize and setVisible
for a JFrame object.
They are:
pack(): This method is an alternative to setSize.
The pack method sizes the frame so that all its contents are at or above their preferred sizes.
The reason why I didn't use it so far is because there is no content inside our frames. Otherwise, its usage
is myFrame.pack().
show(): This method is an alternative to setVisible. It works exactly the same way.
Its usage is myFrame.show().
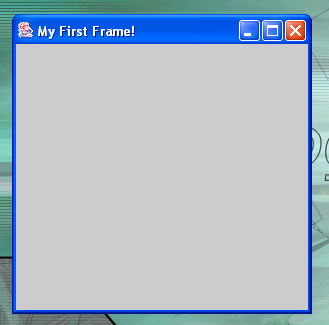
setTitle method:
import javax.swing.*;

public class FramesFun {

  public static void main(String[] args)
  {
    JFrame myFrame = new JFrame();
    myFrame.setTitle("My First Frame!");	// set the title of the frame
    myFrame.setSize(300,300);
    myFrame.setVisible(true);
  }
}
And the next picture shows the result of using the setTitle method. The title bar now contains
the words "My First Frame!".
In fact, you need not use the setTitle method at all. The JFrame class has a constructor
that takes in a String argument that represents the title. The following program code will produce
a similar frame as the previous program.
import javax.swing.*;

public class FramesFun {

  public static void main(String[] args)
  {
    JFrame myFrame = new JFrame("My First Frame!");	// set title using JFrame constructor
    myFrame.setSize(300,300);
    myFrame.setVisible(true);
  }
}
You may not have noticed it, but so far all our frame programs have a little problem.
When you close the frame, the program does not terminate. All we have done
is actually hide the frame.
To solve this problem, we introduce one more method: setDefaultCloseOperation.
Study the following program:
import javax.swing.*;

public class FramesFun {

  public static void main(String[] args)
  {
    JFrame myFrame = new JFrame();
    myFrame.setTitle("My First Frame!");
    myFrame.setSize(300,300);
    myFrame.setVisible(true);
    myFrame.setDefaultCloseOperation(JFrame.EXIT_ON_CLOSE);	// terminates program when frame is closed
  }
}
For now, just accept and memorise that setDefaultCloseOperation(JFrame.EXIT_ON_CLOSE) termiantes
your frame program properly. The method specifies what will happen when you decide to close a frame. Other
possible values besides EXIT_ON_CLOSE include:
DO_NOTHING_ON_CLOSE -- Don't do anything when the user's requests that the frame close. Instead, the program should probably use a window listener that performs some other action in its windowClosing method.
HIDE_ON_CLOSE (the default) -- Hide the frame when the user closes it. This removes the frame from the screen.
DISPOSE_ON_CLOSE -- Hide and dispose of the frame when the user closes it. This removes the frame from the screen and frees up any resources used by it.
EXIT_ON_CLOSE -- Exit the application, using System.exit(0). This is recommended for applications
only. If used within an applet, a SecurityException may be thrown. The EXIT_ON_CLOSE constant is
defined in the JFrame class, and was introduced in 1.3.
Any frame you create is by default displayed in the upper-left corner of your screen.
Use the setLocation(x,y) method in the JFrame class to set the location of your
upper-left corner of your frame at (x,y). Where this corner is placed will
affect where your whole frame is displayed.
What if you want to center your frame relative to the screen? This is harder than it
seems, because different computers have different screen widths and resolutions.
Fortunately, we can use the Toolkit and Dimension classes. Both are found in the
java.awt package.
The Dimension class encapsulates the width and height of a component
(in integer precision) in a single object. This component can be the
computer screen, a frame or a UI component. The Dimension class
has two useful public properties width and height
The Toolkit class contains many useful methods that are concerned with platform-specific services
such as printing, fonts, images, and display parameters.
One of the methods it has is getScreenSize(), which returns the screen size as a Dimension object.
Although the Toolkit is used frequently, both directly and behind the scenes, you would never
create any of these objects directly. When you need a Toolkit, you ask for it with the static
method getDefaultToolkit() or the Component.getToolkit() method.
So if I wanted to find out the screen width and height, I would use the following code
 // obtain the screen size of the user's computer as a Dimension object
 Dimension screenSize = Toolkit.getDefaultToolkit().getScreenSize();

 // Obtain the width and height of the screen
 int screenWidth = screenSize.width;
 int screenHeight = screenSize.height;
Now, let us center our frame with the following code:
 import javax.swing.*;
 import java.awt.*;

 public class CenterFrame {

   public static void main(String[] args) {

     JFrame myFrame = new JFrame();
     myFrame.setSize(300,200);
     myFrame.setDefaultCloseOperation(JFrame.EXIT_ON_CLOSE);

     // Obtain the dimensions of the screen
     Dimension screenSize = Toolkit.getDefaultToolkit().getScreenSize();
     int screenWidth = screenSize.width;
     int screenHeight = screenSize.height;

     // obtain the dimension of our frame
     Dimension myFrameSize = myFrame.getSize();
     int x = ( screenWidth - myFrameSize.width )/2;
     int y = ( screenHeight - myFrameSize.height )/2;

     myFrame.setLocation(x,y);
     myFrame.setVisible(true);
   }
  }
So far, we've covered a lot of frame stuff, but not how to add components to our frames. This last section will cover that.
Every frame object has a content pane. This content pane is where you put all your components, your content, in. The following code gets our frame's contain pane.
myFrame.getContentPane();
After we have the content pane, we add components using the add()
method. The following code adds a JButton component into our frame's
content pane.
myFrame.getContentPane().add( new JButton("Click me!");
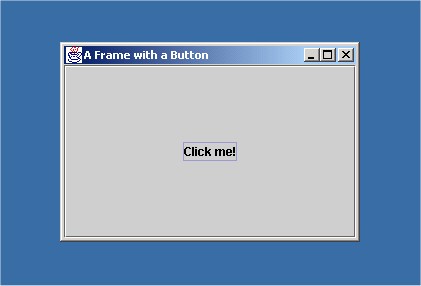
The source code below will make a frame with a button added inside.
 import javax.swing.*;
 import java.awt.*;

 public class FrameWithButton {

  public static void main(String[] args)
  {
    JFrame myFrame = new JFrame("A Frame with a Button");
    myFrame.getContentPane().add(new JButton("Click me!"));    // add a button with label "Click Me!"
    myFrame.setSize(300,200);
    myFrame.show();
    myFrame.setDefaultCloseOperation(JFrame.EXIT_ON_CLOSE);
  }
 }
This picture shows what I got on my University's school computer that runs Windows 2000.
Note that the JButton component takes up the whole frame no matter how
you resize the window. In a future, we'll discuss Layout Managers that will
help us position components within frames better.
Author: Dante Shamest.
Copyright © 2002 Dante Shamest
This tutorial was last modified 16th November 2002